10 AMAZING 3D Printing Projects: Rocky Mountain RepRap Festival 2023
At the beginning of this summer I visited, the Rocky Mountain RepRap Festival in Loveland, Colorado, and it was once again an amazing experience meeting so many great people and getting inspired by so a ton of interesting projects, like belt Vorons, upside down printers, polar printers, chocolate printers, rotary casting, highly fiber filled co-extrusion filament, pumpkin spice filament and so much more. But before we dive a little deeper, I first had to get there, so travel montage here we go!

RMRRF takes place an hour north of Denver, in Loveland, CO
So I took a plane from Munich and due to airplane internet was even able to watch the Starship launch live 35.000 feet up in the air. Landing in Denver was a bit turbulent but once I sat in my rental and saw this beautiful country everything was great again. Well, until my brand new Ford broke down after only 20 miles and I had to get towed back to the airport. The next day started with an amazing breakfast and since I was a bit disappointed that I was visiting the Rocky Mountain RepRap festival but everything was flat around Denver we took the car and drove for two hours through the mountains and ended the day with a beautiful hike in the Rockies. This was the first time that the Rocky Mountain Reprap festival took place and the venue itself was roughly an hour north of Denver in the city of Loveland, Colorado. I mean, I’ve been twice to the Midwest RepRap festival so being at an event that’s closer to the West Coast was great because the audience was significantly different with tons of projects I haven’t seen so far and I am super excited to tell you more about them. Let me know in the comments what you found interesting and what maybe even inspired you to dig a little deeper!

RMRRF 2023
Hero ME
First let’s start with Hero Me which is a modular tool head system that currently allows over 35 Billion different combinations of hotend, extruder, cooling, bed probes and accelerometers. Andy did some amazing work right here and basically built a Lego block system for tool heads. This started because he wasn’t satisfied with the standard part cooling solution on his machines and engineered a solution that was far superior to many of the stock setups. His friends then also wanted to use his cooling solution so he did separate designs for specific machines. Yet this was super inefficient, so he came up with the idea to make all of this as a modular system. And this is where we are in Gen7 now. You got an adapter plate for basically any x-carriage and then mix and match the components you either already have and that you want to use for your specific application. The best thing is he even uses heat set inserts! CNCKitchen.STORE! If you have an extruder or a hotend that’s not supported yet, just send him a mail with a picture of the interface and some reference dimensions and he’ll add it to his library! All of this is free to download and a great start if you want or need to modify your 3D printer!

Hero Me Toolhead System
Voron 24
RepRap festivals usually were dominated by Prusa printers but it was really interesting to see that this year there were definitely more Voron machines at the event than the well-known orange printers from the Czech Republic. The Voron team itself had a huge booth and didn’t only show off their regular lineup but also some special machines, from the huge Voron 24 which is a machine with a 24 x 24 x 24 inches print volume but also some oddities like a Voron Zero with everything printed out of flexible TPU which printed better than one might imagine.

Voron 24 with 24x24x24 in build volume
Voron Belt
The popularity of Voron printers also sprouted a huge range of 3rd party accessories around the project. One particular one that caught my attention was the Belt Bed System by VoronKits.com. What they offer is a parts kit that lets you add a belt as your print platform. Contrary to regular belt printers, this system is only used to eject your prints after they are done. This allows you to still print as fast and precisely as before because the whole motion system stays the same, yet after each print you eject the parts and start all over again without any manual interaction. Since the belt is not as stiff as a regular print bed you shouldn’t print huge parts in warp-prone materials with it but I can see a ton of applications in serial production. And if you still want to print high temp materials they even ship a flap curtain system with it so the hot air is kept on the inside during printing. They even told me that since this is only a kit that they sell, they don’t run into any Stratasys patent problems. (https://patents.google.com/patent/US8668859B2/en)

Voron Belt
Positron V3 by LDO
From printers with a belt axis, let’s come to printers that print upside down! This is the Positron V3 that LDO Motors, how actually sponsored my trip to RMRRF, showed off at their booth. I was super stoked to finally see it in person because it’s in my opinion one of the most interesting printer concepts we’ve seen in the last few years. The idea of the Positron is to have a very compact but also a capable 3D printer that can be folded together to basically the size of a filament box. KRALYN and the team around the Positron project had to overcome a ton of design challenges for that and created custom solutions for many components like a 90° hotend, a sychromesh cable driven motion system, or a see-through but heated build plate because this is kind of the only way you can check your first layer on an upside-down printer! The first design of the bed almost looked like the rear window of your car with resistive traces on glass yet the latest design is even cooler with a transparent conductive coating that evenly heats the sheet without any visual distractions. The Positron project is Open Source and you can theoretically just go to their GitHub and build one yourself. The reason why the Positron V3 was showcased at the booth of LDO is that they support the Positron team to get this amazing tinkering project to the point where you can easily buy and build one without the hassle of sourcing and building parts yourself. LDO Motors have done a tremendous job over the last few years. Their background is stepper motors, and if you have a 3D printer, there is a high chance it uses LDO motors because all major brands rely on them. Over half of the extruders that I recently tested used LDO stepper motors which already tells a lot! LDO also worked together with engineering teams like VORON to provide high-quality printer kits for the small VORON Zero to the V2.4 the Switchwire and the Trident. And with LDOs involvement in the Positron project, they’ll also make sure that we can hopefully soon build one of the most exciting printers with ease.
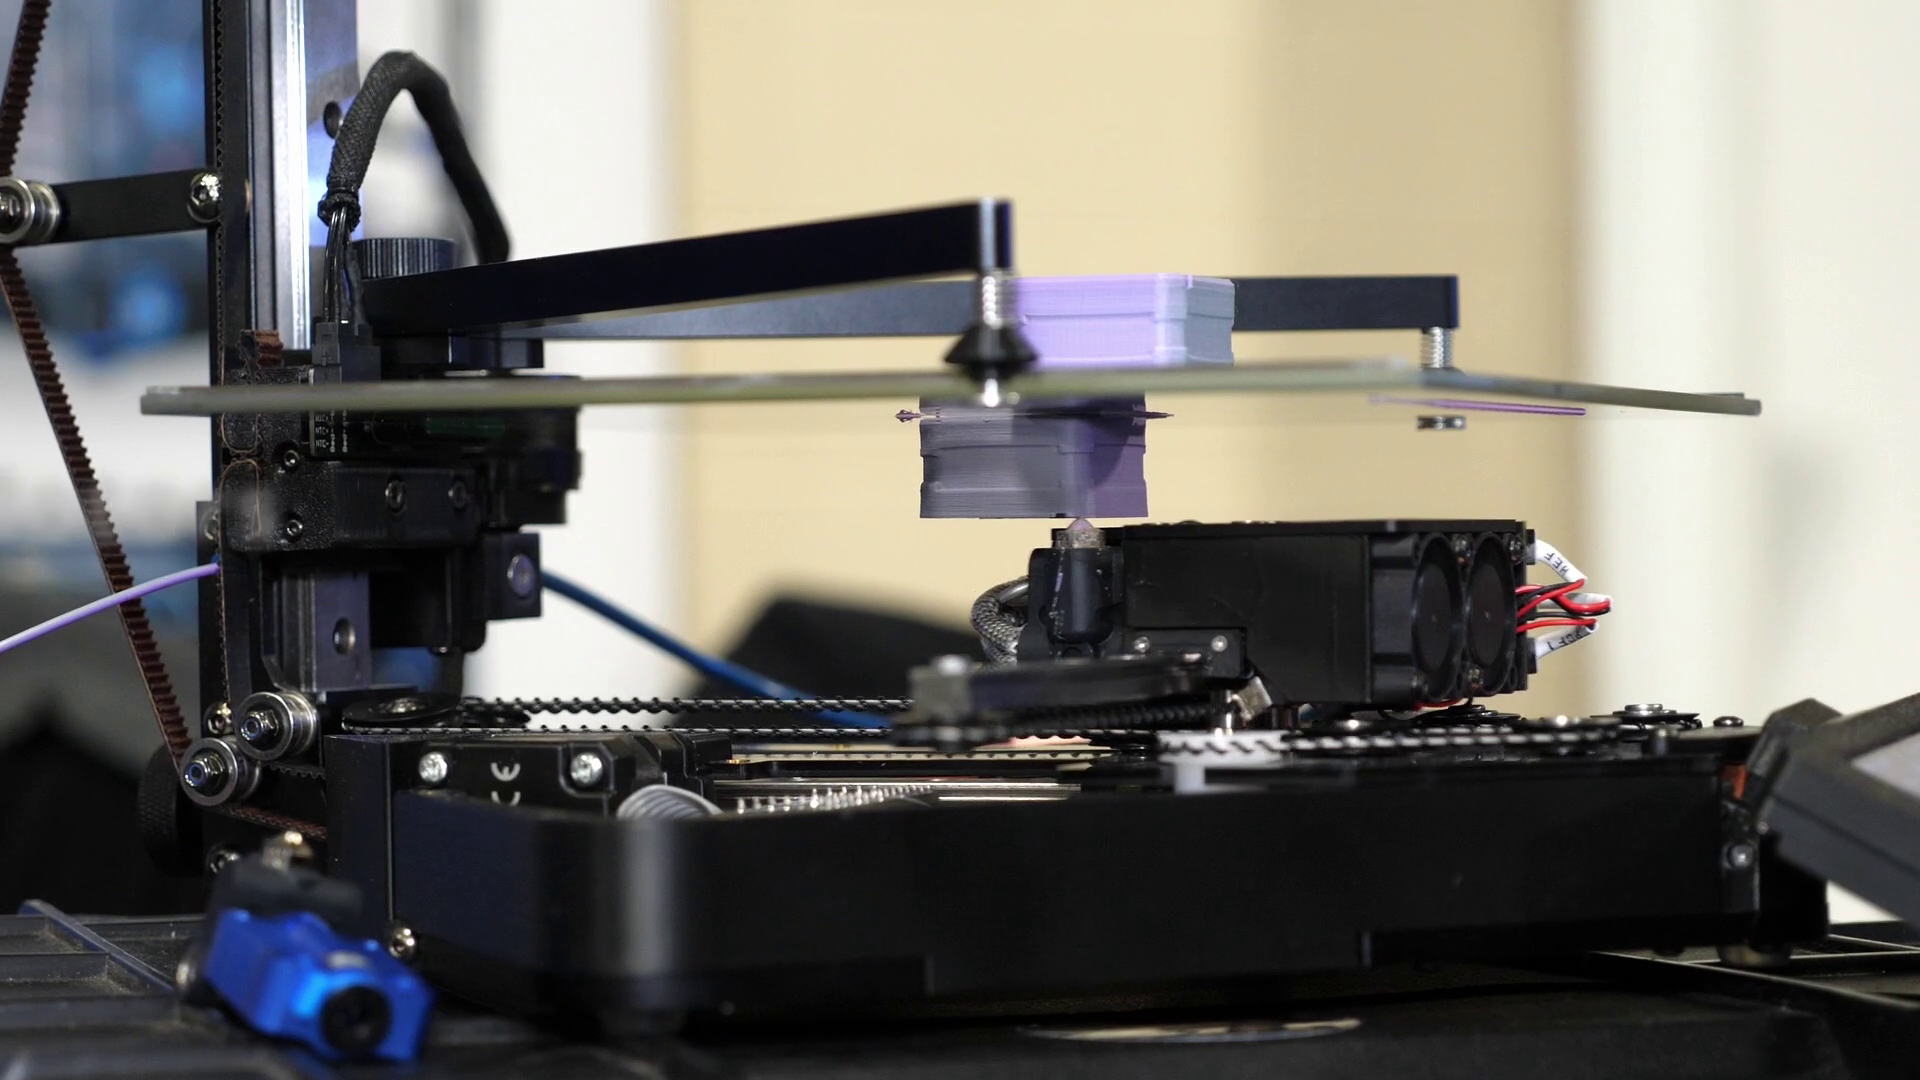
Upside Down Positron V3
P-REXZ
The next cool and really unconventional printer that I saw was the P-REXZ a polar core XZ printer designed by the Armchair Engineering team. Polar 3D printers aren’t something we see a lot these days even though they do have their benefits. One perk of a polar printer is that it needs the least amount of motion system for its print volume. Since the bed is spinning, the x-axis only needs to move the radius of the bed and not the full diameter. Even though there are some non-standard things on the hardware that need to be figured out, like how to get the heater and thermistor wires to an infinitely rotating table which they simply solved by a slip ring. One of the bigger challenges was firmware where they invested quite some brain power. Standard Klipper doesn’t support polar printers with the rotational axis. I think RepRap firmware would have been an option. Still, they went all in and modified Klipper for this really nice-looking kinematics which was quite a task to get all edge cases covered and work with a combination of angles and cartesian coordinates to get nice and smooth print moves or to even get mesh bed leveling working. It’s a beautiful machine to look at, and I had the feeling that they did it mainly for the challenge, yet besides the small size these kinematics might be interesting for multi-axis printing. By adding a 4th tilt axis to the print head you would also get a fake 5th axis because the polar axis of the bed would allow you to reach places that wouldn’t be reachable on a cartesian printer with just a single tilt axis. If you want to build one, the files for the P-REXZ and the fork of Klipper can be found on the ArmChair Engineering Github.

P-REXZ Polar 3D Printer
Phaetus Co-Extrusion Filament
So the guys from Armchair Engineering were at the booth of dfh consume and they had some spools there of the most interesting filament I’ve seen for a while. This is Co-Extrusion filament from Pheatus, and it’s not the stuff that you know from your dual-color prints. This is highly filled carbon fiber or glass fiber nylon coated on the outside with what they call a modified resin to improve layer adhesion. I’ve first seen such a co-extrusion setup with BASF Ultrafuse where they coat the brittle metal-filled core with a flexible skin to make it not as easily break in the extruder. I think Phaetus might also do this also for a similar reason because 25% carbon filling is quite a lot. I haven’t found a ton of info on that filament, so Phaetus, if you are watching this, I want some to test!

Macro Shot of the Co-Extrusion Filament
Cocoa Press
From high-tech nylon filaments to probably one of the most interesting and delicious 3D printing technologies I’ve seen at the Rocky Mountain RepRap festival and this was Ellies Cocoa Press. A chocolate 3D printer that doesn’t suck and is able to print this super tasty brown mass with incredible details. The Cocoa Press doesn’t only look similar to a Voron Zero, they even supported her in the design of the motion system. But the heart of this chocolate printer is the stainless steel syringe-style printhead and the custom-formulated chocolate that gets loaded in it.

Cocoa Press
The models are sliced with any regular slicer, and the standard nozzle the Cocoa Press comes with is 0.8 mm in diameter. Before you start printing you need to heat the 70 g of chocolate for around 15 minutes until the consistency is right. The two heater zones make sure that the temperature can be controlled down to a 10th of a degree because even slight variations in temperature changes the viscosity of the chocolate. The temperatures you print chocolate by the way are around 34 °C for the milk chocolate and around a degree less for the dark chocolate. Even though you can put any chocolate into the Cocapress, Ellie, of course, recommends using hers because it has the right formulation for a good viscosity, is bubble-free, and is ethically sourced. If you live in the US or Canada, you can reserve a kit machine right now, and I really hope that Ellie will even sell me one for Germany because this will probably be the first 3D printer my wife fully approves!
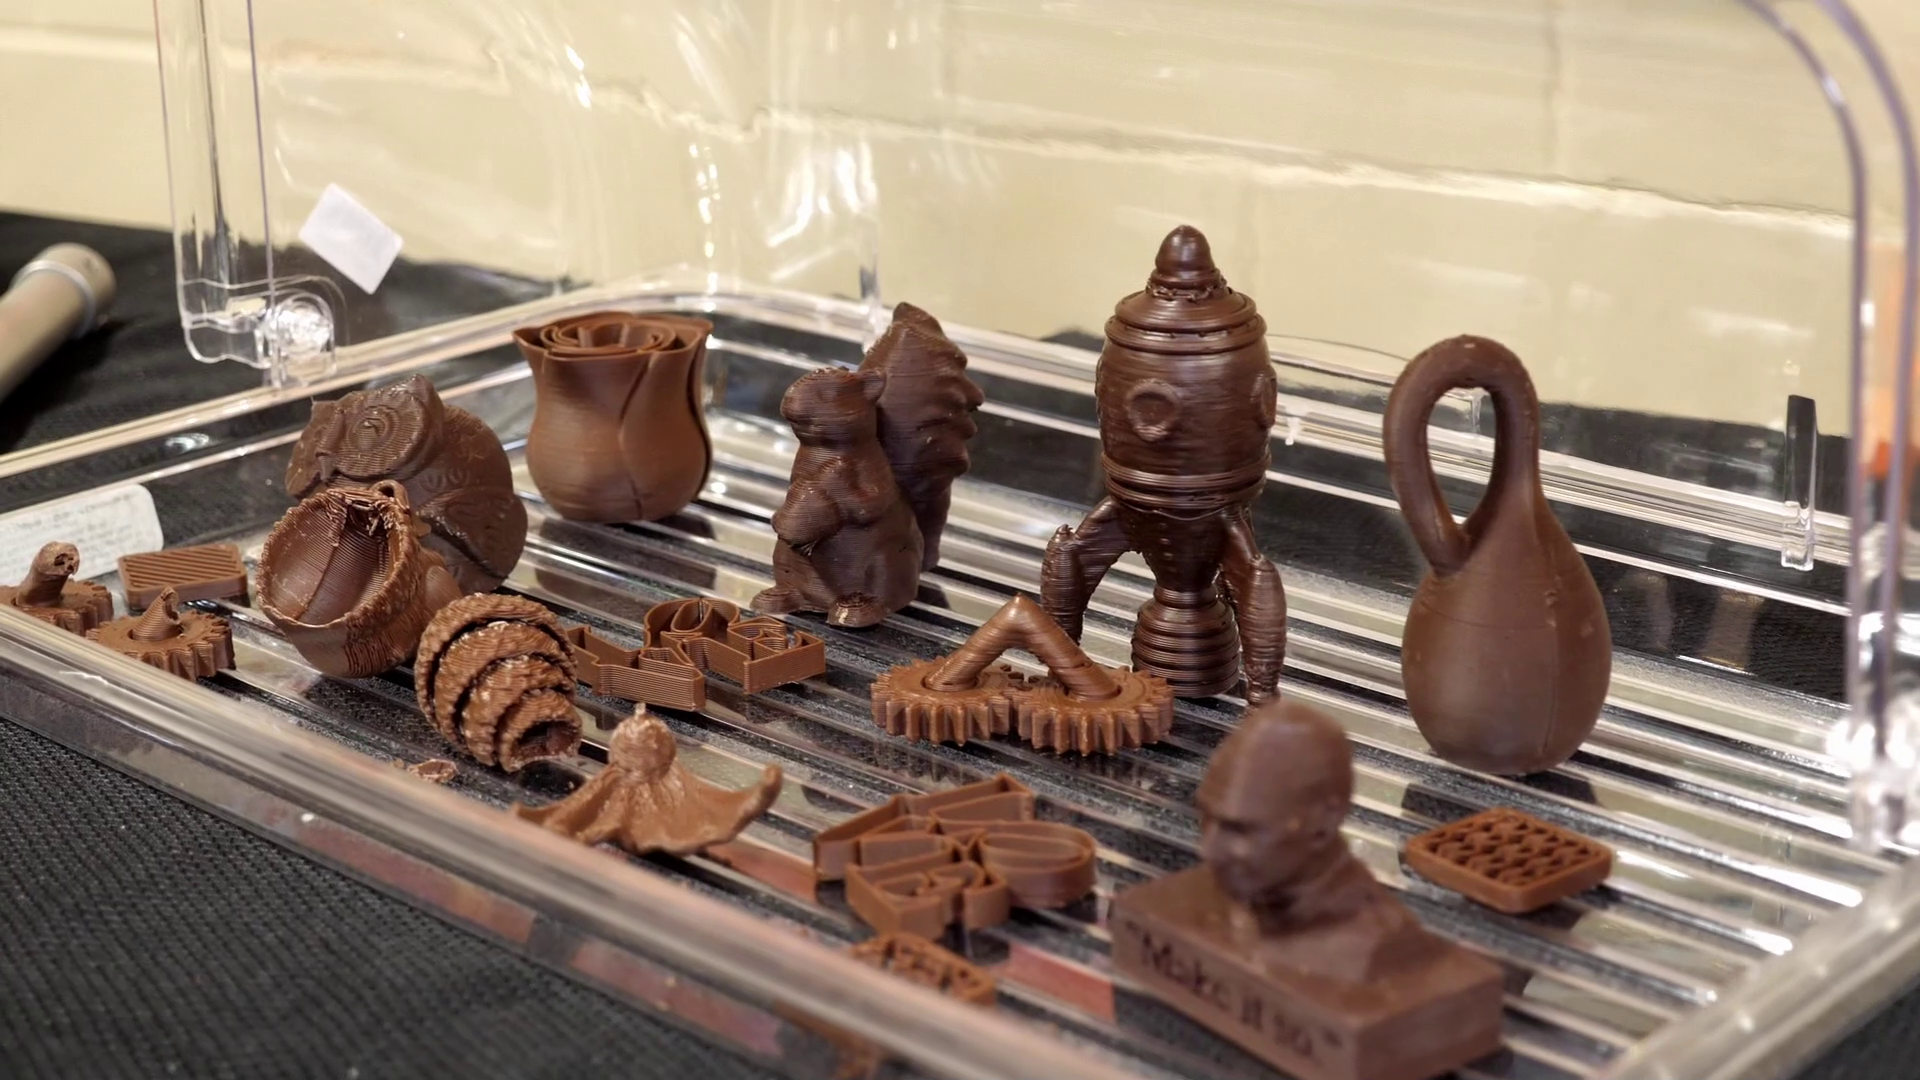
Chocolate 3D Prints
Pumpkin Spice Filament
And after awesomely tasting prints to awesomely smelling prints. This is pumpkin spice filament from Canadian filaments. And this stuff didn’t only look like pumpkin soup it smelled sooo nice! Unfortunately printing it gets rid of most of the good smell, but hey, it’s a great alternative to the fart-smelling glow-in-the-dark filament I recently tested.
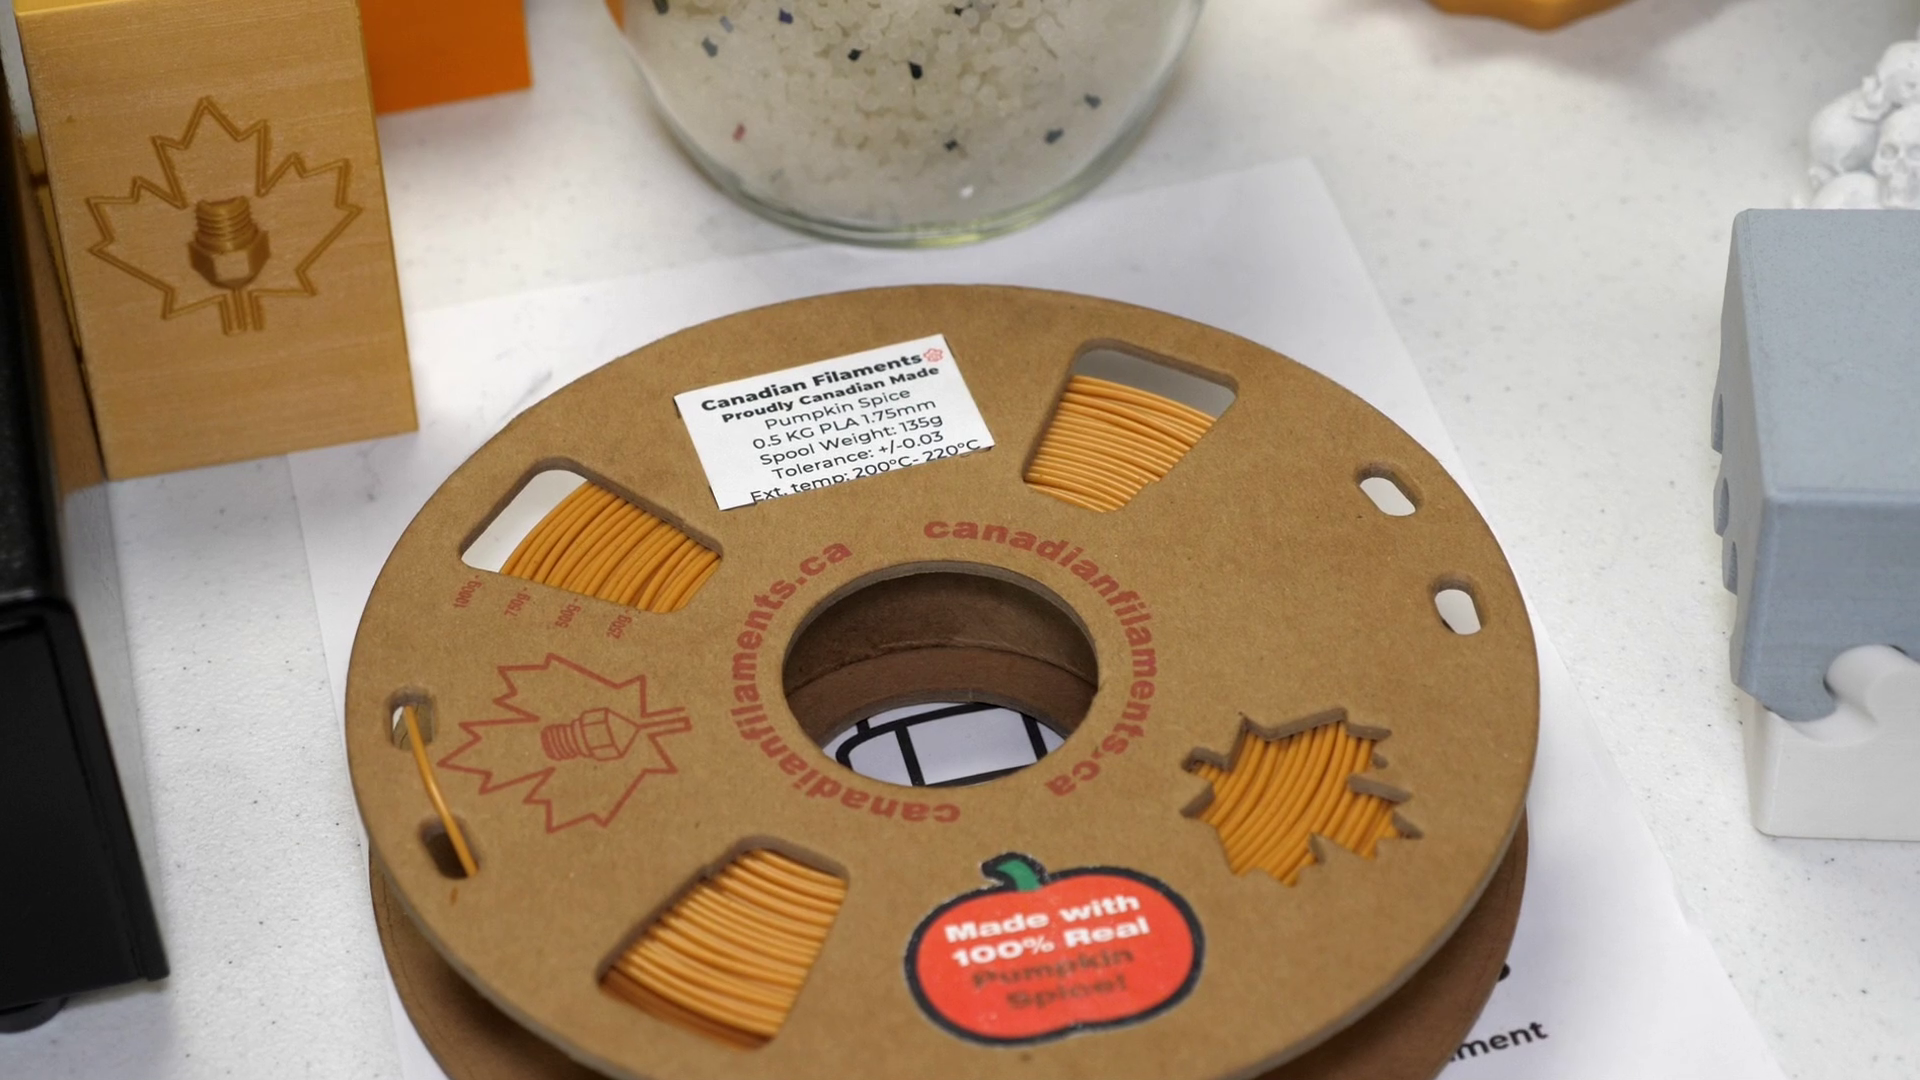
Pumpkin Spice Filament
3D Chameleon
And if you want to print the beautifully smelling Pumpkin Spice filament together with the Rotten Egg Red Glow in the Dark then the 3D Chameleon might be the perfect solution for you. The 3D Chameleon that Bill showed off, is already the 3rd iteration of a multi color addon that you can put on almost any FDM 3D printer, and the interesting thing was that Bill actually showed it on Bambulabs X1 where due to shorter unloading distances and a way smarter purging routine he cuts down the time for a filament change in half and reduces filament poops to a minimum. If you buy the kit, you’ll get the 4 color multiplexer, the feeder and selector unit, a control box, and the selector switch. When you install it on a machine, you add the trigger that’s used to indicate when a filament change should take place somewhere where you can bump it with your bed or your hotend. Once activated the sophisticated cam system then selects and feeds the filament to the nozzle. Of course, it’s not as clean looking as BambuLab AMS but it also only costs half as much. One of the reasons why Bambulab's multi-material system works so reliably is their use of a filament cutter, so you don’t drag the half-molten end of the filament through your Bowden tube potentially jamming something. Yet Bill also has a solution for that and calls it his 3DClippy which is a DIY filament cutter that you can for example add to your Sovol SV-06 to make it an ultra-reliable multi-color 3D printer together with the 3D Chameleon. It’s compatible with many machines and if you want more information check out his website!

3D Chameleon on the Bambu Lab X1C
PhotonCast
All of the projects we’ve taken a look at so far were extrusion-based, so the last one I really wanted to show you is the Photoncast from Lowry3D, a rotary casting system for UV resins. The idea is really simple yet clever. You print a mold using a translucent filament, add some mold release, pour in some resin, and install the mold in the fixture. When it rotates it covers all surfaces with resin and then blasts it with UV light to harden and after just a minute you’ve got a finished part. I find the idea really interesting and due to the control over the movement you can even change the wall thickness in different locations or even embed electronics in the parts. Charles told me that his idea behind the Photoncast is to be an affordable machine for mass production with a ton of flexibility due to easy manufacturing of the molds and the quick cycle times, and he wants to launch his machine on Kickstarter this year. I would have hoped to see even some more complex parts but I’m sure we’ll see him again on the next RepRap festival!

PhotonCast UV Exposure Box